Well I decided to do the three band ornament, sans tassel, and I smocked three of them. But then I began to have doubts. I really like the pattern but I'm beginning to suspect that the fabric is too soft to make maintain nice crisp pleats between the rows. Rather than make a decision I decided to forge on with getting the balls ready to smock.
I'd like to make a minimum of 17 smocked ornaments for Christmas presents so I've decided to prepare that many before I decide. As of today I have 13 smocked or ready to smock.

I have managed to make a decision about the ribbon. The burgundy samples I got confirmed that the one I have is Medoc. I also received a sample of Tropic Wine. It is quite a bit browner (something like DMC 902) but it works well behind the Medoc. I didn't receive any Hug Snug green samples that I liked better than the Dark Olive. (Which is something like DMC 3787.) In a perfect world I'd have found one more like the Moss coloured satin one. But when it comes to craft supplies compromise is an ever present necessity.

Monday September 17
I now have 17 balls either smocked or ready to smock. Plus 2 "experiments" that I can keep for our tree or, in a pinch, use as gift ornaments.

Friday September 21 2012
If I include the 2 experiments I now have 12 smocked and 7 ready to smock. I hope that the Tropic Wine ribbon is in my mailbox this morning. I'd like to make a few pansies before I smock the rest.


P.S. I was happy to find the Tropic Wine and Dark Olive ribbons in my mailbox this morning and quickly set about pressing them. I was surprised to discover that there was only 26 feet (instead of 30 feet) of the Tropic Wine. Now I'm hesitating to start using it in case the seller won't be able to supply the missing 4 feet of ribbon.I was hoping to use a bit more than 6 inches for the back petals but now unless I scrimp I won't have enough left to make an ornament for our tree. I'm crossing my fingers for a positive response from the seller.
I guess until I know I best keep smocking.
Thursday September 27 2012
I found out this week that there is a possibility that I'll have a visitor on Friday who can transport 3 of the ornaments, and save me some postage. So on Tuesday I made a quick trip to town to buy some gift wrapping supplies. I also finished smocking the 17th ball on Tuesday. (Whew!)
I spent a good chunk of Wednesday making and installing the pansies and leaves. It took much longer than expected, partially because just as I was finishing the 9th set of front petals I spilled Fray Stop on two of them. Despite my best effort to clean them they weren't salvageable.

So I had to make two more petals before I carried on. Eventually I had all the pansies, leaves and end caps done and I was ready to assemble the first gift ornament.

(The whole time I've been working on this project I had been pondering ways to evenly space the leaves around the top. I imagined using a small triangle, or a circle divided into three sections. When it came time to do it I realized that the smocking pattern has 27 diamonds at the top. All I had to do was to place a pin in every ninth diamond and then place the center line of each leaf along the pleats that run from the top of the diamond to the top of the ornament.)
I stuck the point of each leaf to the ball using a drop of FabricTac glue.

I used double sided tape to attach the green ribbon to the flat buttons. Two pins hold the button to the ball.

Each flower was centered between two leaves. They are stuck in place using a dot of FabricTac glue.

I gathered two layers of the light weight polyester crepe fabric over the 18 mm bead cap before I added the rayon thread. I applied a bit of FabricTac to the underside and then used a pearl head pin to stick it to the bottom of the ball.

I got about 2 1/2 of the gift ornaments assembled before I spilled the Fray Stop again. This time it was a brand new spool of thread that soaked it up. I put the Fray Stop in another room and decided to quit for the night. Frankly I was more than a little discouraged with both the process and the look of the ornaments. (I cheered up when I found an email from the person who sold me the Tropic Wine seam binding. She wrote to say that she'll send me another 10 yards!)
In the morning I finished the third ornament.
When it was done I decided to take some glamour photos before I wrapped them up. By the time I was finished the photo shoot I was feeling a lot better about the look of the ornaments.


Here they are with the other smocked balls.


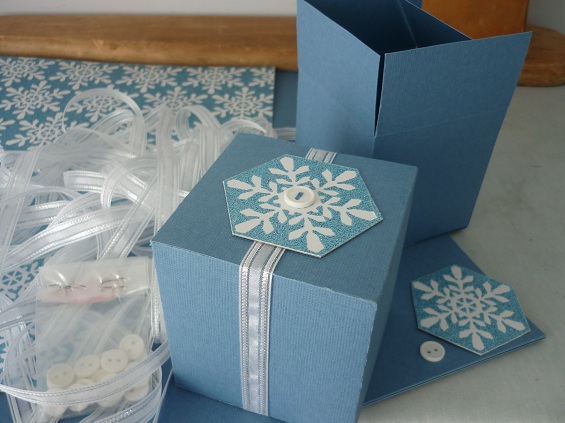
And then I had to quickly whip up some gift boxes. When I bought the blue card stock and white ribbon I pictured a snowflake sticker holding the ribbon to the box. However after looking in three stores I concluded that there probably won`t be any suitable snowflake stickers in my local shops until after Hallowe'en. So I purchased a piece of card stock with a snowflake design instead.
Here are the two boxes I made from the first sheet of card stock. The cut out snowflake seemed a bit flat so I added a little white button.


Thursday October 4th 2012
Three ornaments went on their merry way last weekend and I almost finished the rest of the ornaments this week. I now have 16 gift ornaments completed. When the Tropic Wine seam binding arrives I'll be able to make the 4 back petals that I need to finish two more. (One additional gift ornament and one for our tree.)

Friday October 5th 2012
No seam binding in the mailbox this morning so I guess I'll make some boxes this weekend. But first I thought I'd take a progress photo against a background that provides a better contrast.

No comments:
Post a Comment